Thursday, December 15, 2011

Autodesk Product Design Suite Launchpad

Autodesk Labs has recently posted a tool to optimize your product design workflow.  It's called the "Autodesk Product Design Suite LaunchPad".

The LaunchPad Technology Preview accelerates design efforts by providing a single portal into Product Design Suite applications, project data, and workflows. The LaunchPad’s one-click workflows prepare your design data in the Suite environment that is most appropriate to your task so you can quickly start designing, engineering, simulating, and visualizing your design. The LaunchPad is intended for users who already have Product Design Suite installed.


This new LaunchPad contains tools to help automate the following workflows:

  • Reuse 2D Data
  • Modify 3D Geometry
  • 3D Parametric Design
  • Stress Analysis
  • Dynamic Simulation
  • Technical Drawings
  • Interactive Design Review
  • Photorealistic Rendering
The LaunchPad also has the ability to set default Inventor templates as well as project file support for better control over how the Inventor-related workflows are started.  The desktop icons are also scalable to accommodate different screen configurations.

With the latest updates, the LaunchPad offers two sets of one-click workflows, each supporting different industry design tasks.
  • Machine Design: For users who typically work with a variety of 2D and 3D data to design, engineer, analyze, and simulate machines.
  • Plastic Part Design: For users who need to transform concept designs and styled surface models of molded plastic parts into engineered, manufacture-ready solid models.
The following NEW Plastic Part Design workflows are available in this technology preview update:

  • Concept Sketching
  • Styling
  • Design Engineering
  • Materials Selection Analysis
  • Stress Analysis
  • Technical Drawings
  • Explore Design Alternatives
  • Photorealistic Rendering
Keep in mind that this is a Technical Preview and will be available until May 30, 2012.  To download a copy of the "Autodesk Product Design Suite LaunchPad" goto:


Wednesday, December 7, 2011

Authoring Inventor Content for Plant 3D

If you are you asking the question “how can I use my Inventor data inside of AutoCAD Plant 3D” then look no further. If you have content that already exists inside of Inventor and you would like to use that content inside of Plant 3D then simply read below. Autodesk has taken the steps with this utility to easily export data out of Inventor and import that same data into your plant design.

Using a Pump design from Autodesk Inventor 2011
1
    • Ensure the units for the Inventor model match the units of the Plant 3D project
    • This can be set in Inventor under Tools > Document Settings

2
    • Ensure the orientation of the Inventor model is aligned with the Z-axis pointing up
    • TIP:  If the orientation of an existing design isn’t aligned, you can insert the model into a new assembly and apply the necessary constraints in Inventor to orient it properly

3
    • Start the AEC Exchange environment in Inventor from Environments > AEC Exchange

4
    • Author important connection points for Plant 3D to re-use
    • Plant 3D understands Nominal Diameter Size, Connection Type, and Direction
    • Ensure Nominal Diameter = standard library size (e.g. 4.0in)
    • Ensure the connector direction arrow is pointed away from the model. This gives Plant 3D the required orientation for starting and ending routes. You can still define the flow direction as required in the properties.


5
    • OPTIONAL:  You can reduce the “heaviness” of the Inventor model by creating a Shrinkwrap Substitute. This can improve performance in Plant 3D if this component is used frequently.
    • Shrinkwrap Substitute can be found in Inventor under the AEC Exchange environment

6
    • Select Export Building Components to package up the Inventor model and relevant component item data
    • You can assign the component to an OMNI class application type, and include important data like Description, Manufacturer, Model No., Cost, etc.
    • Select OK to browse to a location to save the .ADSK file output


7
    • After saving the .ADSK result, a summary report is generated letting you review the success of the output. The file is now ready to be used in Plant 3D.

Wednesday, November 16, 2011

Updated Information on AutoCAD WS

We are in the middle of our MUG (Manufacturer User Group) meetings and there seems to be quite a bit of interest in AutoCAD WS.  I have posted about AutoCAD WS before, but I told some people at the meetings that I would post the link.  Here you go:
AUTOCAD WS WEBSITE AND SIGNUP

I am interested in the different way that people are using this so let me know how you use it (matt.cole@adraft.com).  Please reference the Adraft Tech Talk blog in your subject line.

Thanks!

PS If you are interested in the MUG meetings, please follow this link:
Adraft Events Signup

Wednesday, October 12, 2011

AutoCAD on a Mac? Scarier than Frankenstein on Halloween!

I am a windows person through and through, so it is scary to me that AutoCAD is in the native Macintosh environment now!  It is kinda like Frankenstein. 

Think about it… Autodesk pumped life into a product in a different form (or “platform”).  I am not saying that they used lightning and dead body parts, like a brain!  [Anyone remember the “a-b-normal” brain from the movie Young Frankenstein?  Classic!]  It has the same functions as AutoCAD on a PC with some minor differences.  Frankenstein had the same functions as a person with some minor differences.  Now do you see my connection?  If you want to learn more about some of these differences, please check out this link:
I have come to the realization that as long as AutoCAD on the Mac is not hurting the town folk, everything is going to be fine.   With that said, there are other “Frankensteins” that have come to the Mac environment.  Check out this link for more information on what Autodesk is doing in the Mac environment:
Actually, this is not scary, it is exciting!  Now, I can sleep …  whew.

Thursday, September 22, 2011

Autodesk Labs: Jig and Fixture Design for Inventor

Jig & Fixture Design extends Autodesk Inventor's native capability with an extensible library of standard jig and fixture components which are attributed to support an enhanced level of automation intelligence. Retrieve components from the library dragging and dropping them into your design environment. The components auto-locate themselves when placed and their fasteners can be auto-populated. Based on initial tests, your overall design time can be reduced by over 50%. 


See http://labs.autodesk.com/utilities/inventor_jigs_fixtures  for more info.


Monday, September 12, 2011

Are You Ready to Print Your Dinner?


George Jetson wouldn't be impressed......
Just as we begin to get used to the idea of 3D printers that print better versions of themselves, scientists at Cornell Creative Machines Lab are working on a machine that prints portions of food.


First impressions from a report in Fast Company are that the scientists involved in the development are not natural gourmet foodies. One of their first successes was a deep-fried scallop nugget in the shape of a space shuttle. “They can also make a solid hamburger patty, with liquid layers of ketchup and mustard, or a hamburger substitute that’s made from vegan or raw foods,” according to the report.


Read more...

Tuesday, August 23, 2011

Writing to a MS Word document from Autodesk Inventor

I thought I would get into a little customization this time.  What kind of customization, you ask?  The kind that doesn't really require any experience to do.


That's right, customizing Autodesk Inventor with iLogic.  We have all seen how iLogic can be used to create some pretty incredible rules-based designs.  Well I am going to extend it and use it for something outside of Inventor.


In this example, I have to create a document that accompanies my Inventor file.  This is a simple document that contains a table with 3 pieces of information:  the File Name, the Part Number, and the Designers name.  What I want to do is create a rule that will create this document automatically from the information in the iProperties of my Inventor file.


Here's how we connect iLogic to Word: iLogic can write to Bookmarks contained within a Word document.  So my first step was to create a word file that contains bookmarks that correspond to the data I want to write.  Below is a screen shot of my doc template:
Within my Inventor file I add the following iLogic code:


'set the folder name
fol ="C:\iLogic"
'Create the Word Application Object
wordApp = Interaction.CreateObject("Word.Application")
'Add the template document to the Word Session
wordDoc = wordApp.Documents.Add (fol & "\Export_to_Bookmarks.docx", Visible:=False)
'Write to the Bookmarks in the template
wordDoc.Bookmarks("FNAME").Range.Text = ThisDoc.FileName(False) 'without extension
wordDoc.Bookmarks("PNUM").Range.Text = iProperties.Value("Project", "Part Number")
wordDoc.Bookmarks("DES").Range.Text = iProperties.Value("Summary", "Author")
'Save the Word file with a new name
wordDoc.SaveAs (fol & "\" & ThisDoc.FileName(False) & ".docx")
'Quit Word session
wordApp.Quit(0)
As you can see, we first define our folder location and then create a connection to MS Word.  We then add a document from our "template" where we put the bookmarks into it.  We then simply write out our information into the appropriate bookmarks. Lastly we save the Word document to a new name and quit MS Word.

The resulting Word document looks like this:
I realize that this is just a simple example, but you can apply this to any document you want to.  If you would like a copy of the part file and the word file I used in this example, send an email to techtalk@adraft.com and I will send them to you.

Tuesday, August 9, 2011

Using the Correct Network License Manager

As with all new products, change is inevitable.  Sometimes it's not very obvious. This post deals with just such a change.  Autodesk has used FlexLM to manage its network based licenses for sometime.  It's not too complicated to setup, but it is based on two critical pieces of information, the HOSTNAME and the HOSTID.  Putting this in simpler terms, the name of the server and the ethernet address of the server.  Here is where the change occurred. Windows XP and Server 2003 used a protocol named IPV4.  Newer operating systems such as Vista, Win7, and Server 2008 use IPV6.  So what you ask, it's just a newer version, isn't it?  The issue is that the format of the address changed.  See below:


IPV6 Address:  fe80::9ac3:d037:427a:6906%10
IPV4 Address: 210.169.100.45


The network license manager that is shipped on the Product discs/downloads/flash drives is IPV4 compatible.  If your machine/host is running IPV6, your license manager will not be able to resolve the information correctly and will fail when trying to server your licenses.  


What you need to do is simply download the IPV6 compatible version of the network license manager from Autodesk.  I have supplied links for both the IPV4 and IPV6 version below.


If you need the older license tools (11.7), it can be found here:


Wednesday, August 3, 2011

Launching Regular AutoCAD when Installing AutoCAD Mechanical

A frequently asked question to the Adraft tech team is "I have installed AutoCAD Mechanical, how do I launch just regular AutoCAD?"

AutoCAD Mechanical sits around base AutoCAD, with that being said, when the Mechanical software is installed, it's the AutoCAD Mechanical shorcut icon that's placed on the desktop. That's where the question from above is asked. First, if you never plan on using AutoCAD Mechanical, you can delete the shortcut icon from the desktop. Next follow these simple steps:

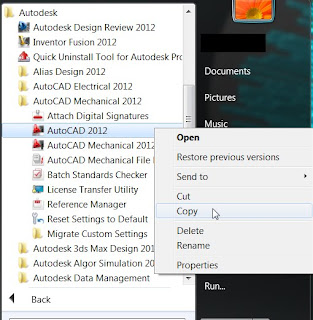
1 - Select Windows Start Button>All Programs>Autodesk>AutoCAD Mechanical (Version).
2 - Find the AutoCAD (Version) icon and right click and copy.
3 - Finally, go out to your desktop and paste the AutoCAD shorcut. See image below:


Wednesday, July 20, 2011

Are you BIM Ready and Able?

If you are a manufacturer and work with the building product manufacturing segmentincluding HVAC, lighting, plumbing, doors/windows, and furniture systems—you have probably seen that many companies are requiring very specific content to be delivered for use in the AEC community. The process that drives the need for this type of content is known as Building Information Modeling (BIM) and is rapidly becoming the standard around the globe. This can present a significant challenge (but also new opportunities) for your organization and can drive a need for your organization to develop new strategies and workflows to deliver BIM-ready content for use by customers and distribution channels.

Autodesks solutions for Digital Prototyping can help the various disciplines involved in BIM to communicate and interpret design intent required to design, build, and operate a successful project. Through Digital Prototyping, project teams involved with BIM can better simulate performance and constructability of a project digitally before its built to deliver projects faster, with fewer errors and coordination issues, and at less cost.

Autodesk Inventor can allow manufacturers of building and plant products to produce BIM ready models for AEC consumers. 
The BIM Exchange methodology aims to increase accuracy of designs from product fabricators to BIM modelers, increase product adoption in the marketplace, and reduce costly placement and type errors associated with rework of an already existing model designed in another CAD package.

Wednesday, July 6, 2011

REMINDER: Autodesk Mechanical Desktop Discontinued!

This is a REMINDER!  Autodesk ceased development of Autodesk Mechanical Desktop and is no longer releasing new versions of the product.  Autodesk discontinued development of Mechanical Desktop because the technology in this product was outdated and in order to support the needs of the larger and growing community of Inventor users, Autodesk decided to transfer MDT development resources to support the Inventor product family.

Mechanical Desktop (MDT) 2009 was the last version of the software to be made available.  With the new releases of Autodesk software, Autodesk has updated (or patched) MDT 2009 to allow it to work with other Autodesk software.  This will not continue forever, so you need to plan accordingly.

If you still rely on MDT for data, you need to create a plan to migrate your data to Inventor.  Adraft has been spreading this message for the last few years, but some people still have not made the transition. If you are a previously licensed user of Mechanical Desktop software and have uninstalled Mechanical Desktop 2009 or are installing Inventor on a new computer then you will need to download new installation files that are compatible with Inventor.
Here is a link to get MDT that has been patched to work with the newest release:

Friday, June 24, 2011

AutoCAD Electrical Productivity


AutoCAD or AutoCAD Electrical? A Productivity Study.
The most frequently asked question I receive from the AutoCAD user community that are thinking about switching to AutoCAD Electrical is what type of productivity gains can you expect to receive when making the transition. From a user’s perspective I could personally give you countless examples of how much more productive you can be but that would take up too much time and space for a blog posting. Keeping this simple, AutoCAD Electrical software is built specifically to create and modify electrical controls designs. AutoCAD Electrical design software includes all the functionality of AutoCAD plus a complete set of electrical CAD features. Comprehensive symbol libraries and tools for automating electrical design and drafting tasks help to save hours of effort. Built-in reporting tools help eliminate errors and provide accurate information to manufacturing. All of these features plus the many others allow more time for design and engineering.  Autodesk performed a very simple study that details the productivity gains that users can expect to see when moving from basic AutoCAD to AutoCAD Electrical. In the study Autodesk performed ten tasks and calculated the time it would take to perform each task inside of both AutoCAD and AutoCAD Electrical. Then they calculated the percentage of time saved for each task with a total at the end. Most AutoCAD users are surprised at the results but it comes as no surprise to the users that have standardized on AutoCAD Electrical for all of their electrical CAD design needs.

Below is a table of the results of the study. I encourage everyone to click on the link below the table. The link will take you to the white paper on Autodesk’s website which will enable you to view in detail how they were able to calculate and come up with the results for each specific category.

Wednesday, June 15, 2011

Using your digital camera for more than just photos!

Autodesk Labs is at it again! Do you have an object, room, or even an entire building you want to view in Autodesk products? Project Photofly is a new technology preview on Autodesk Labs that may be able to help. This preview allows you to take a series of photos of an object, and Photofly does the rest by "stitching" the photos of the object together to create a 3D cloud point model.


Highlights

  • Allows anyone with a digital camera to create near accurate 3D models from photographs using the web.
  • Utilizes common point and shoot digital cameras.
  • Harnesses the power of cloud computing to translate photos into detailed 3D models.
  • 3D models can be manipulated by design software (e.g., AutoCAD, Inventor, 123D).
  • Allows sharing through YouTube, iPad, iPhone, and iPod Touch.

Learn more about Project Photofly : Autodesk Labs

Wednesday, June 8, 2011

Buzzsaw/Streamline Go Mobile

Many things are going "mobile" these days.  Some are just for fun, but some are very useful.  This was one that makes a lot of sense to me!  Buzzsaw or Streamline (they are the same technology) have a mobile app that allows you to download and upload data to a Buzzsaw or Streamline site.  I believe that this could be very useful for managers, service guys, or anyone needing to access data quickly away from their computer and internet.  You need a data signal and to have a Buzzsaw/Streamline site with login/password.  I have used this a few times and love the capability to access data while onsite.  Take a look at this link:
Mobile Application for Buzzsaw

Friday, May 20, 2011

Vault 2012 – View your data in a different way

With the release of the 2012 Vault products, users now have a choice of how to view their data in the Main View Pane.  Up until now, a detail view of the files was the only option.  Sub-folders were not displayed, and if a file preview was needed, a thumbnail could be added to the properties displayed.  2012 now offers a Detail View as well as Large and Small icon views.

Large Icon View
Detail List View

As you can see from the images above, when one of the icon views is selected, the file is represented by a preview image.  Sub-folders are also displayed and are colored according to the category they are assigned to.

The changes in viewing were not limited to the Main View; the Preview Pane also got a boost.  When a file is selected in the Main View, users were presented different preview tabs representing the History, the Uses and Where Used tabs, as well as a Preview tab.    Up until now, the Where Used tab showed us a list of all the parent files that reference the selected part. 

Vault 2012 takes the Where Used tab and enhances it to reflect not only the parent files, but all the Vault entities that reference the selected part.


As you can see in the image to the left, previewing a part can now show you its parent assembly, any change orders it is used, its parent folder, as well as any items it is assigned to.


The amount of information that is displayed is controlled by a display filter. A user can opt to see everything or just the parent assembly as in previous versions.


Monday, May 16, 2011

Tutorial Files and Help Files for Inventor 2012

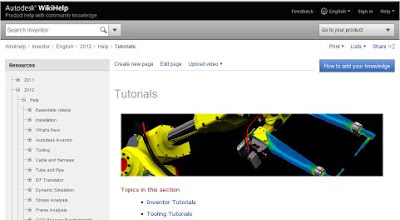
Autodesk has changed a few things with the Help System and the Tutorial Files with the AutoCAD Inventor 2012 release. Now, by default, the Tutorial Files need to downloaded separately from Autodesk and the Help system is accessed through the Autodesk WikiHelp.

Autodesk Inventor 2012 Wiki Help

If users would like to download and install the full Help System and the Tutorial Files they can be downloaded from the following link;

http://usa.autodesk.com/adsk/servlet/index?siteID=123112&id=16463987


Monday, May 9, 2011

Give Feedback to Adraft on Services!

Adraft is always looking for ways to improve the quality of technical support and expand upon the services it offers it's community. In order to provide quality technical support and gain a better understanding of your current issues and concerns, we are asking for your cooperation in completing this survey.  Your time and feedback is greatly appreciated and we ask you to answer this survey openly and honestly. The survey should take less than 5 minutes.  This information will assist us in identifying areas of concern, and providing measurement and guidelines for better services to our clients.


We ask that you please take this survey no later than May 13th.   At that point, we will close the survey and evaluate the entries.


Thank you in advance for your feedback and your time!