Wednesday, October 10, 2012
"Autodesk 360", Crystal Clear?
Wednesday, July 25, 2012
Apps in Inventor?
 What's an app?
You may be a bit behind the times if you are asking yourself what an app is at this point. But just in case there are a few out there who have not moved to a smart phone/tablet PC, an app is a small program written to extend the functionality of another program, for example, Inventor. Apps are the easiest way for a user to customize what they want Inventor to do for them. The idea of using apps for a CAD program may seem odd, but think about all those times you wished Inventor did something slightly different, or displayed something it doesn't. Now those options could be just a download away.How does it work?
You can access Autodesk Exchange from the welcome screen or next to the "sign in" for subscription center. Autodesk Exchange is a website where users can browse, search, rate, and even review apps. The website is easy to navigate with categories making it easy to find the apps that are related to your industry. The apps are also easy to install, after downloading, all you have to do is run it.
Have experience writing 3rd party software? Sign up, and start posting your own creations for others to use!
Whats the catch?
There really isn't one. Most of the apps are in the $0.99 to $5.00 range. Some even have an option for a trial, so you can try them before you actually buy. That doesn't mean all of them have a cost involved, quite a few are free. I've tried out quite a few of the free ones, and to be honest, there are some worth paying for.
For more information on Autodesk Exchange and the apps available there: Autodesk Exchange
Thursday, June 7, 2012
Bring your machine layouts to life.
Overview
Traditionally machine line layouts in a factory are created with pen and paper or in the form of 2D drawings. Using these means, it is extremely difficult to explain the working intent of the machine lines to clients or internal stakeholders. Using 2D workflows, it is very challenging to account for movement of material, people, and material handling devices and show them interacting with each other inside the facility. The inability to clearly articulate the working intent often results in losing bids to competition and the inability to sell ideas to stakeholders.Project Factory.Modz() is a free* Physics Based technology preview for Factory Animation that enables you to bring your machine line layouts to life and clearly articulate the working intent of the layout to your clients and stakeholders. It helps you to visually communicate your ideas by animating the movement of material and people inside your facility. It is easy to use, does not require CAD expertise, and you can be up and running creating your first animation in less than 5 minutes.
Game Technology meets CAD
-
Physics Based Animation Environment
Project Factory.Modz() is powered by an underlying physics engine. This enables you to animate the machine lines with the highest degree of realism and see the effect of force and collisions in animating material movement inside your facility.
-
Artificial Intelligence
Project Factory.Modz() is powered by Autodesk® Kynapse® which is an artificial intelligence middleware that empowers game developers to build compelling character behaviors in video games. It offers high performance path finding within dynamic environments and automated tools for generating AI data. With Autodesk Kynapse technology inside Project Factory.Modz(), you can perform automated path finding operations for human workers and material handling devices such as forklifts inside your facility.
-
1-Click Workflow
Project Factory.Modz() is tightly integrated with Autodesk Factory Design Suite with a 1-Click Workflow. This enables you to use Autodesk Factory Design Suite to create layouts by dragging and dropping assets on the factory floor and with a single click transfer them to the Project Factory.Modz() environment for animation workflows. All the necessary geometry, constraints, and animation Meta data is automatically transferred which gets you started quickly.
Availability
This technology preview is available until July 31, 2012.To download and see more videos visit Autodesk Labs
Thursday, May 3, 2012
Autodesk Vault Office 2013 Web Client
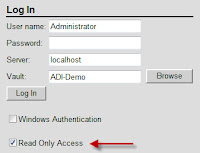
The first thing you will notice is when you login to the web client. There is now a check box to login in a "Read-Only" mode.
Logging in with the "Read Only Access" toggle on will allow the user to access Vault Web Client with the same functionality that was available in previous releases.
Toggling this option off will enable the enhancements provided in the 2013 Web Client. In order to install Vault Office 2013, you must first have Vault Workgroup, Collaboration, or Professional installed.
Once the user has found the file they are looking for, they will see a new option to check out the file.
After they are done they can check it back in
This functionality is supported in a variety of different browsers:
- Apple Safari 4 or 5
- Google Chrome 13
- Microsoft Internet Explorer 8 or 9
- Mozilla Firefox 6
- Microsoft Excel 2003, 2007, or 2010
- Microsoft Outlook 2007 or 2010
- Microsoft PowerPoint 2003, 2007, or 2010
- Microsoft Word 2003, 2007, or 2010
Thursday, April 12, 2012
Track Changes in Autodesk Manufacturing 2013 Products Here!
Wednesday, March 28, 2012
Controlling Linetype Scale in AutoCAD
Using linetypes are beneficial to differentiate between types of geometry in AutoCAD. These types of geometry can be hidden lines, center lines, visible lines, and so on. Depending on the scale of your drawing, linetypes will be displayed differently. Understanding and controlling the scale of the linetypes is important to making the drawing look correct.
Here is an example of how linetype scale can change the display of a line. The “Center” linetype is being displayed on these four lines, each of them is being displayed at a different linetype scale. As you can see the spacing and the length of the line is altered as the scale is changed.
Note: from top to bottom the linetype scale is being reduced by .25 each time.
Linetype scale can be controlled a couple of ways. The first way is through the properties panel (with the geometry selected). In the "General" section, there is a "Linetype" option.
The other method is to use a command (LTSCALE) at the command line. This is a global setting, meaning it will affect all the lines with a linetype applied to them in the drawing.
Note: This method will affect the scale of linetypes you may have already manipulated through the properties menu. Example if you set a line to be at .5 through the property menu, and then set LTSCALE to be .5 the line you originally selected to be .5 will now be at .25 overall scale.
Thursday, February 23, 2012
Take the Guess Work Out of Rendering with 3DS Max Design 2012
 Tired of all the guess work with that comes with making a rendering? Look no further than 3ds Max Design 2012. With the recent addition of the iRay rendering option, users now have a much less complicated form of creating photo realistic images.
iRay Rendering functionality is great for those who don't want to spend hours waiting for an image to cook up, only having to tweak a few more settings, and start the waiting game again.
A few advantages to using iRay:
- No More Guessing - iRay is built around calculating the lights, shadows, reflection, and refraction. No more tweaking the exposure setting to get the proper lighting in your scene.
- Time Based - Have an initial presentation due in an hour? No problem! iRay allows you to set the time for it to render, and it does the rest. This works in the opposite direction as well, you can set it to render until you want it to stop.
- Autodesk Material Library - using iRay does not require you to use a special set of materials. Users have access to the 1200 unique materials found within most of the Autodesk products.
- Ability to Pause - iRay gives you the ability to pause and save an image of the rendering at its current state, then start right where the rendering process left off.
To find out more about iRay Rendering:
http://usa.autodesk.com/3ds-max/
http://www.youtube.com/watch?v=81jH1p7FWRU
Image courtesy of Marriott International, Inc & Autodesk
Monday, February 6, 2012
WANTED - Missing Dialog Box
 Have you ever experienced the dreaded "Missing Dialog Box"? You know there is supposed to be a box that shows up in your program but instead the program just seems to freeze. Or better yet, the program is telling you to enter the information in the dialog box. You search high and low, but there's nothing on your screen.
 Don't beat yourself up, it probably a case of the dialog box slipping off your screen. This can happen for a number of reasons. Maybe you changed your screen resolution, or maybe you typically use dual monitors and now you have only one. Either way its a fairly simple fix.
First - change your screen resolution to its highest setting and see if you are able to see the dialog. It could be that it is near the edge of the screen and is not displayable at lower resolutions. If you do see it, drag it back to the center of the screen and return your resolution to its previous setting.
If changing the resolution does not resolve the problem, here is a simple method to get it back.
- While the dialog box is supposed to be on the screen, press <alt> then the <space bar> then <m> all together. Pressing in this order and all together puts the dialog box in a "Move" state.
- Press the left or right arrow keys to move the dialog box in either direction. Once you do this, the dialog box is attached to your mouse cursor.
- Move your mouse and place the dialog box in the center of your screen.
- Click to place the dialog


