Tuesday, August 23, 2011

Writing to a MS Word document from Autodesk Inventor

I thought I would get into a little customization this time.  What kind of customization, you ask?  The kind that doesn't really require any experience to do.


That's right, customizing Autodesk Inventor with iLogic.  We have all seen how iLogic can be used to create some pretty incredible rules-based designs.  Well I am going to extend it and use it for something outside of Inventor.


In this example, I have to create a document that accompanies my Inventor file.  This is a simple document that contains a table with 3 pieces of information:  the File Name, the Part Number, and the Designers name.  What I want to do is create a rule that will create this document automatically from the information in the iProperties of my Inventor file.


Here's how we connect iLogic to Word: iLogic can write to Bookmarks contained within a Word document.  So my first step was to create a word file that contains bookmarks that correspond to the data I want to write.  Below is a screen shot of my doc template:
Within my Inventor file I add the following iLogic code:


'set the folder name
fol ="C:\iLogic"
'Create the Word Application Object
wordApp = Interaction.CreateObject("Word.Application")
'Add the template document to the Word Session
wordDoc = wordApp.Documents.Add (fol & "\Export_to_Bookmarks.docx", Visible:=False)
'Write to the Bookmarks in the template
wordDoc.Bookmarks("FNAME").Range.Text = ThisDoc.FileName(False) 'without extension
wordDoc.Bookmarks("PNUM").Range.Text = iProperties.Value("Project", "Part Number")
wordDoc.Bookmarks("DES").Range.Text = iProperties.Value("Summary", "Author")
'Save the Word file with a new name
wordDoc.SaveAs (fol & "\" & ThisDoc.FileName(False) & ".docx")
'Quit Word session
wordApp.Quit(0)
As you can see, we first define our folder location and then create a connection to MS Word.  We then add a document from our "template" where we put the bookmarks into it.  We then simply write out our information into the appropriate bookmarks. Lastly we save the Word document to a new name and quit MS Word.

The resulting Word document looks like this:
I realize that this is just a simple example, but you can apply this to any document you want to.  If you would like a copy of the part file and the word file I used in this example, send an email to techtalk@adraft.com and I will send them to you.

Tuesday, August 9, 2011

Using the Correct Network License Manager

As with all new products, change is inevitable.  Sometimes it's not very obvious. This post deals with just such a change.  Autodesk has used FlexLM to manage its network based licenses for sometime.  It's not too complicated to setup, but it is based on two critical pieces of information, the HOSTNAME and the HOSTID.  Putting this in simpler terms, the name of the server and the ethernet address of the server.  Here is where the change occurred. Windows XP and Server 2003 used a protocol named IPV4.  Newer operating systems such as Vista, Win7, and Server 2008 use IPV6.  So what you ask, it's just a newer version, isn't it?  The issue is that the format of the address changed.  See below:


IPV6 Address:  fe80::9ac3:d037:427a:6906%10
IPV4 Address: 210.169.100.45


The network license manager that is shipped on the Product discs/downloads/flash drives is IPV4 compatible.  If your machine/host is running IPV6, your license manager will not be able to resolve the information correctly and will fail when trying to server your licenses.  


What you need to do is simply download the IPV6 compatible version of the network license manager from Autodesk.  I have supplied links for both the IPV4 and IPV6 version below.


If you need the older license tools (11.7), it can be found here:


Wednesday, August 3, 2011

Launching Regular AutoCAD when Installing AutoCAD Mechanical

A frequently asked question to the Adraft tech team is "I have installed AutoCAD Mechanical, how do I launch just regular AutoCAD?"

AutoCAD Mechanical sits around base AutoCAD, with that being said, when the Mechanical software is installed, it's the AutoCAD Mechanical shorcut icon that's placed on the desktop. That's where the question from above is asked. First, if you never plan on using AutoCAD Mechanical, you can delete the shortcut icon from the desktop. Next follow these simple steps:

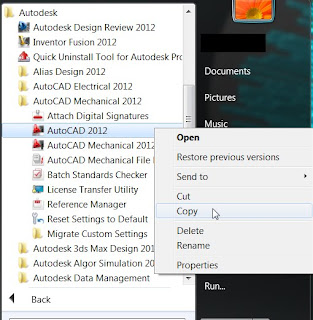
1 - Select Windows Start Button>All Programs>Autodesk>AutoCAD Mechanical (Version).
2 - Find the AutoCAD (Version) icon and right click and copy.
3 - Finally, go out to your desktop and paste the AutoCAD shorcut. See image below: